FREE SHIPPING on all orders over $75!

How to Organize Your Day + Notebook Sale!

By Kristan Kremer on October 17, 2016

How to Organize Your Day

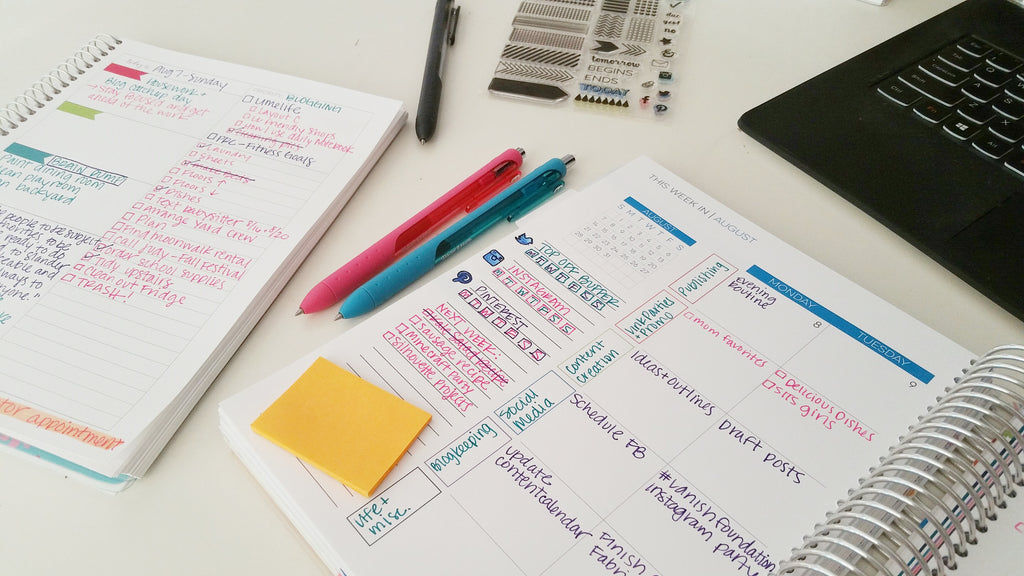
The Limelife Planner Daily Notebook has been a game changer for organizing my day, so I thought it’d be fun to give you a peek into how I use it to stay productive. I am currently using the Layout 2 version to keep track of everything I need to do on a daily basis. 

Limelife Planner Daily Notebooks are a great way to organize your daily routine.

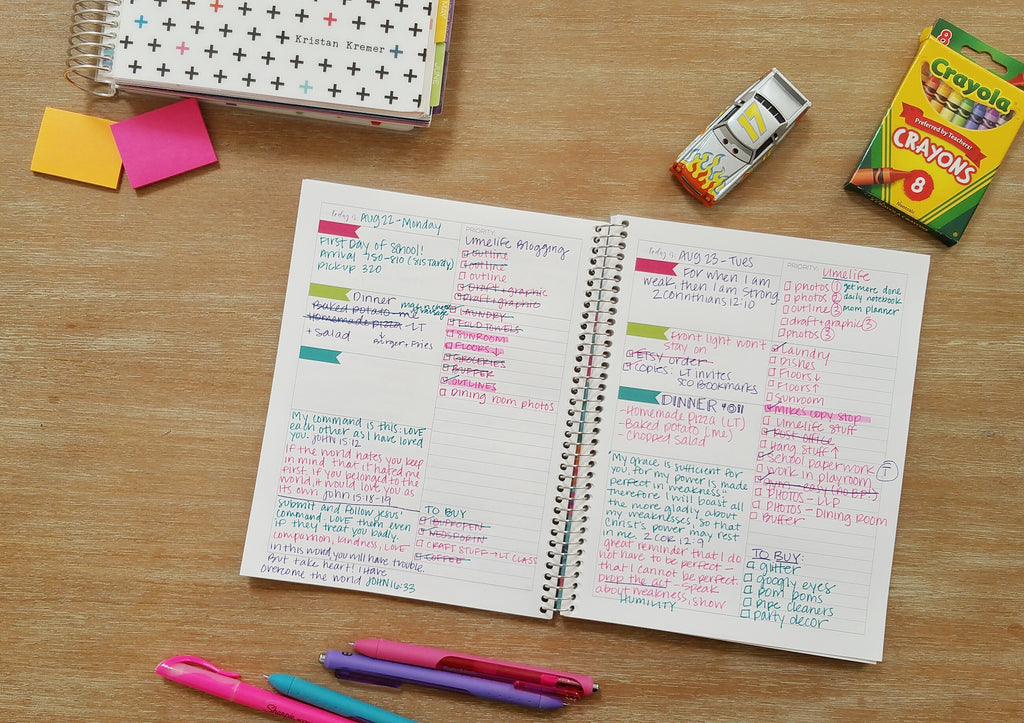
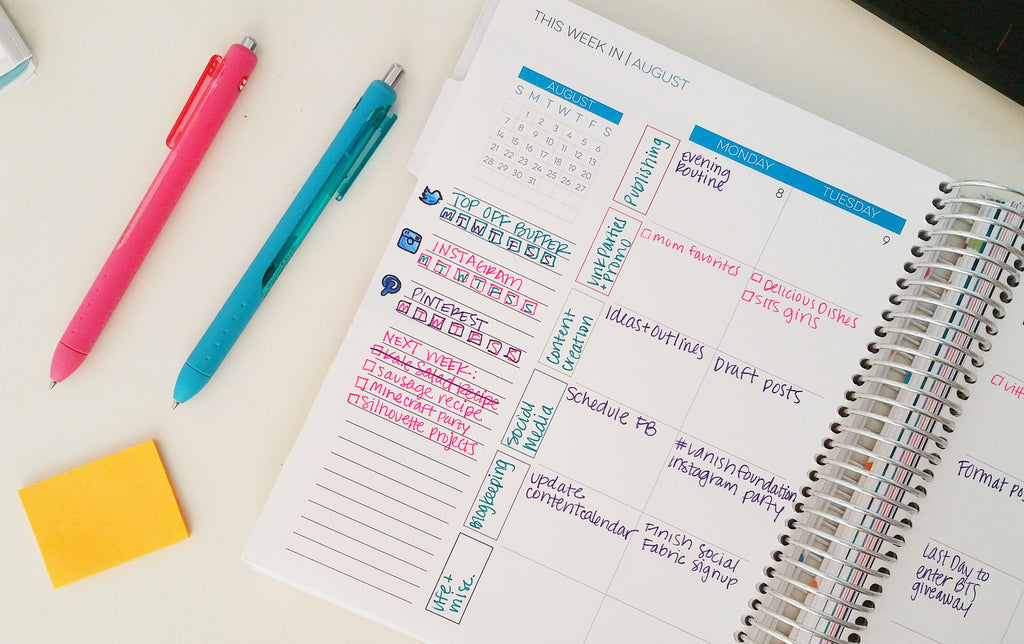
My Layout 2 notebook is my lifeline for the day. On the top right of the page, the priority box keeps me on task. It’s important for me because I can easily get lost in all the little tasks that need to get done throughout the day. I feel better about my day when my priority task gets completed, despite how many of my other tasks get done (or not).


Below the priority box, there is a spot for a list. I use this space as a to-do list (though I know some people use it for a grocery list or even notes). On this list, I note daily recurring tasks, such as laundry and dishes, as well as other tasks I might need to get done that day. Sometimes I add subtasks to this list that support the priority task.

Limelife Planner Daily Notebooks are a great way to organize your daily routine.

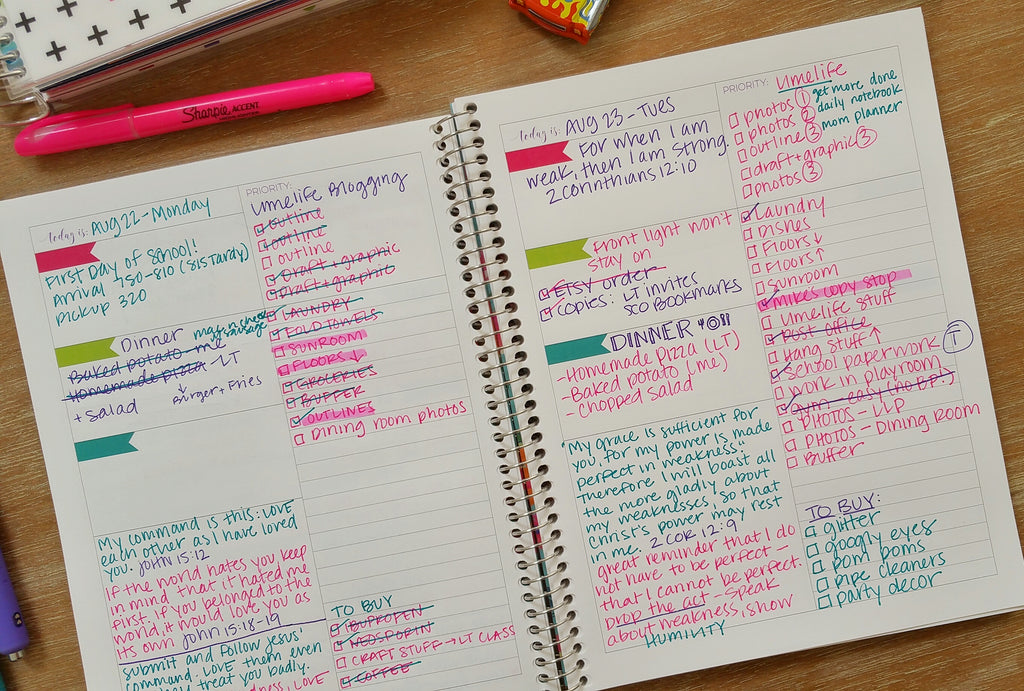
When I start a task, I check the box. This signifies that something is happening, but the task is not complete yet (for example, laundry is started, but hasn’t been folded and put away). When the task is complete, it gets marked through with a line. If there’s a task that I don’t get to (and there usually is), I highlight it to draw attention for the next day.  

On the left side of the page, there are three boxes with flags. I use the top one to note any events happening that day. I use the next two flag boxes for any other events or errands I have going on that day. Sometimes I put dinner plans in there as well, but to be honest, lately we’ve been relying quite a bit on convenience food while my husband is traveling.

Limelife Planner Daily Notebooks are a great way to organize your daily routine.

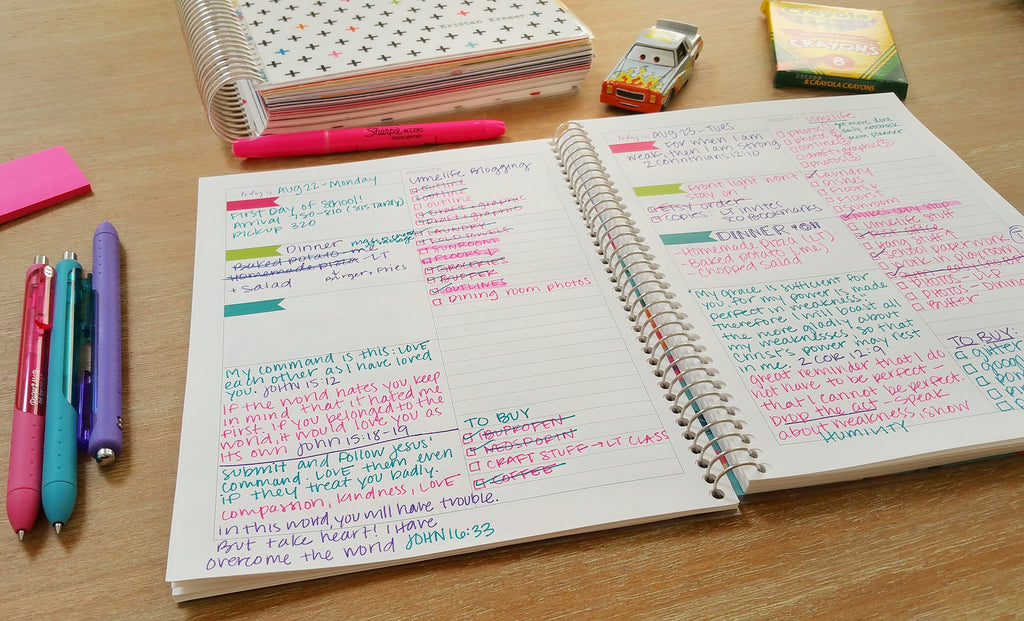
The next part is my favorite! Below the flag boxes, there’s one large box. I use this section for bible study. If bible study is not your thing, you could use this space for an inspiring quote or even a doodle of the day.


The great part about this notebook is that it's not dated. If I have a blowoff day where we just sit around and don’t do a thing, I don’t have to waste a page. Same goes for those days where I’m running a mile a minute and don’t have time to stop and write down tasks.

Limelife Planner Daily Notebooks are a great way to organize your daily routine.

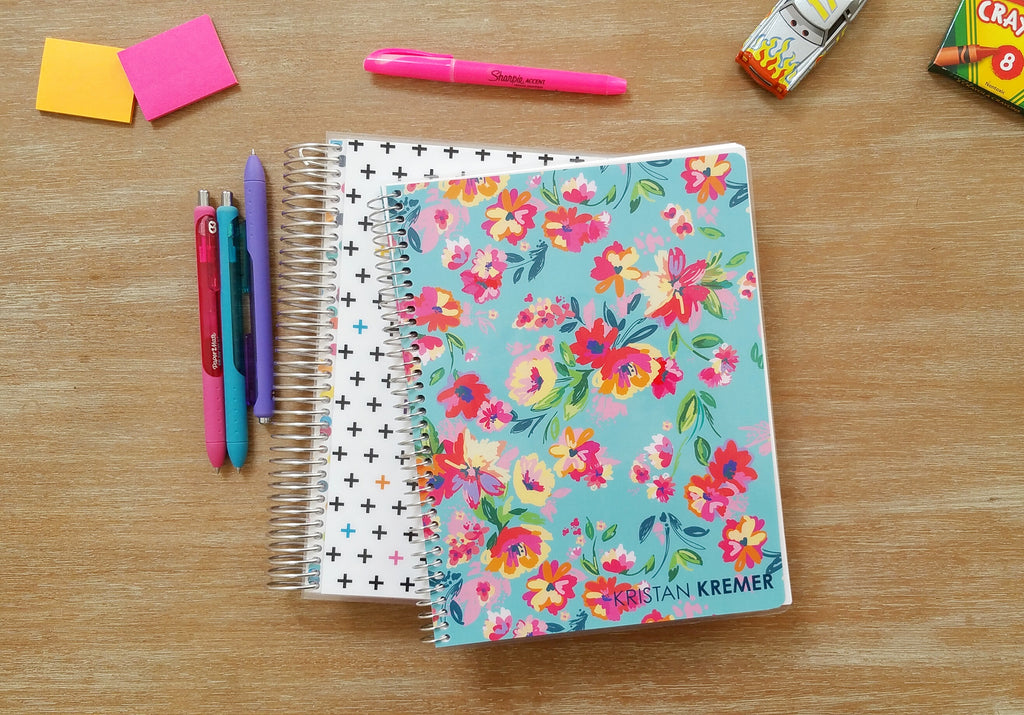
And of course, since it’s Limelife, the notebook has room for customization. In addition to choosing from three great layouts, I was able to add a beautiful blue floral cover (Willa) with my name on it.


I hope you enjoyed this peek into how I plan my day with my Limelife Daily Notebook! To make it even sweeter, I wanted to let you know about a great sale - starting today, the Daily Notebook and ALL OTHER notebooks are ON SALE! That's right, 20% off, no coupon code needed. This is an amazing deal, so make sure to scoop up a few!

Shop notebooks here.

Shop specialty notebooks here.

This post was written by Kristan Kremer for the Limelife Planners Media & Creative Team. For more information about Kristan visit her on Instagram @kristankremer. Please share and repost this blog entry with your friends! All we ask is that you give credit to Limelife Planners and the post author.

How To Use a Planner for Blogging - Limelife Planners Layout C

By Kristan Kremer on October 03, 2016
1 comment

How to use a planner for blogging

A little while ago, I showed you how I use my Limelife Layout C to organize my schedule. If you missed it, you can check it out here. Since I wrote that post, I’ve discovered that Layout C is absolutely perfect for organizing all the tasks that go into blogging. I have been trying to take my blogging game to the next level, so it’s nice to be able to see my blogging week at a glance. There is a lot more that goes into to blogging than one might think, so staying organized is crucial to make sure nothing gets overlooked. Here’s a look at how I am currently using my Layout C for blogging.

how to plan blog posts


Sidebar Area

In my sidebar, I like to keep track of daily habits. It takes less space here to make a little weekly checklist for things I want to do every day. Mostly these tasks are social media related. Limelife Sticker Stamps include the cutest little social media icons that are perfect for adding a little flair to this area.


I also like to have an idea of what is coming up in future weeks because I am usually working on those posts in advance. This saves me from having to flip back and forth. Staying organized and efficient helps me get ahead on my blogging, which helps it stay fun instead of stressful.

how to organize blogging tasks


Categories

Next, I have my six categories. I just hand write them in now, but once I get my Silhouette figured out, I want to make some label stickers to add some personality and save time. Here’s a breakdown of how I’m labeling my categories:


  1. What’s publishing (blog posts or YouTube videos)
  2. Networking (link parties, promo days, events, etc)
  3. Content Creation (outlines, writing, photos)
  4. Social Media (scheduling reminders, comments)
  5. Blogkeeping (behind the scenes blog tasks)
  6. Life + Misc (plans for the day so I have an idea how much time I can work)

Batching

I like how my Layout C lets me batch my tasks. I have found that working on similar tasks all at once helps me be the most productive. As a busy stay at home mom with a couple of businesses to run and a couple of blogs to write for, productivity and efficiency are key to making sure I get the things done I want and need to get done. Each day I spend a certain amount of time working on each category. And for content creation, each day is dedicated to a certain subcategory. For example: When it’s time to work on content, I know exactly what to get started on depending on what day of the week it is. Here’s my breakdown:


  1. Mondays - Brainstorming ideas and writing outlines
  2. Tuesdays - Draft posts from the previous day’s outlines
  3. Wednesdays - Format posts from the previous day’s drafts
  4. Thursdays - Take and edit photos and make images for social media
  5. Fridays - Miscellaneous and catch up


How to plan blogging calendar


I also use my Daily Specialty Notebook (Layout 2) to help me plan my day a little deeper (I include personal and household stuff here too - stay tuned for a post with an in depth look!). So there you have a little sneak peek behind the scenes of how I organize blogging with my Layout C. Do you have a separate planner for your blog, work, or business? Which layout do you love to use for it?

Fall Bucket List: 20 Things To Do in the Fall

By Kristan Kremer on September 26, 2016

Fall Bucket List: 20 Things To Do in the Fall

The leaves are changing colors and the days are getting shorter! There's a crisp cool breeze that's cooling off the hotness of summer and that means one thing: pumpkin spice lattes, comfy sweaters, football, and boots! (Okay, so that was more than one thing!)

Fall Bucket List | 20 Things to do This Fall

Fall Bucket List

Fall is quickly approaching, lucky for me it's my favorite season! Fall weather brings fall activities and lots of fall festivities to write in my planner!

20 Things to do this Fall. Writing these in my planner now!


I have 3 kids and we love doing outdoor activities in fall. Some as simple as walking or going and visiting new parks. Others include October festivals for Halloween and, of course, the apple orchard and the zoo. Here's my list of things that are a must for fall:

20 Things To Do in the Fall


1. Apple Orchard
2. Pumpkin Farm (we like to check out two different ones, we do the big one and find usually a small town one to support as well.)
3. Farmers Market
4. You Pick Farmers Market is always fun as well - make sure to wear boots (gets muddy) and nothing too fancy! You will definitely be getting a little dirt under your nails.
5. Make crockpot applesauce with the apples you picked at the apple orchard. Here's a great, easy recipe to follow.
6. Make apple cider. Here's one of my favorite recipes.
7. Make caramel apples, my personal favorite! We like to use Reese's pieces, M&M's, crushed candy bars and sprinkles. The  toppings list can go on, there are endless possibilities!
8. Attend a fall festival - one of our favorites is at a local amusement park. They have a dress up for Halloween and go trick or treating the whole month of October.
9. Family Photos!! If you want the most beautiful shots you can dream of, the October sun and backdrop is unimaginably perfect! Book now most photographers fill up early.
10. Go hiking! Some of the most amazing things you can do in fall are free and beautiful! We have a beautiful state park that is a couple of hours away from us in Illinois! Starved Rock State Park is beautiful, full of waterfalls and in the fall, the colors of all the trees are just perfect!
11. Make a scarecrow! I'm all about DIY! Go to the thrift store, get a flannel, some overalls, a hat, and grab some hay (most craft stores, Home Depot and Menards have this in stock during the fall). Get to stuffing! Put him (or her) on the porch or in the yard!
12. Make it a night in of SCARY MOVIES (or kid-friendly scary movies!) Some of our favorites are : Hotel Transylvania, The Nightmare Before Christmas, Hocus Pocus, Coraline, The Legends of Sleepy Hallow, Beetle Juice, Corpse Bride and Harry Potter to name a few! For the adults, definitely Halloween movies and Saw, throw in some Freddy with that too! FREAKY!!
13. Rake leaves and jump in them! Collect some different colorful ones for an art project!

Check out this fall bucket list with 20 things to do in the fall with your kids. I need to write some of these down now so I don't forget!

14. Make a colorful art project and frame it! For kids, something simple as a leaf wreath or a hand tree with leaves is an adorable keepsake. Here are some great ideas. 
15. Go to a haunted house!!!
16. Make an apple pie or pumpkin pie! (YUMMM) Here's a classic recipe for an apple pie.
17. Go to a football game! Whether it be a high school team, college game or NFL! Go out for a fun day of tailgating with some family or friends! GO TEAM GO! 🏉
18. Roast s'mores, grab some blankets and sit out and enjoy the chill of the fall with a good roasting.
19. My personal favorite is to carve or decorate pumpkins! I like to decorate the whole house in pumpkins - real and fake!
20. Go trick or treating. If your kids are grown, go with grandkids, neighbor kids, whoever! Whether it's cold, soggy, wet or even snowing. Bundle up, grab a Pumpkin Spice Latte and get to walking! Have fun!

Happy Fall Y'all!

Fall Bucket List | 20 Things to do This Fall...Gotta write these down in my planner. My kids will love these!


This guest blog post was written by Jamie Lee, mother, entrepreneur and photographer at Reveal Photography. Please share and repost this blog entry with your friends! All we ask is that you give credit to Limelife Planners and the post author.

Cleaning Schedule

By Katie Poppe on September 06, 2016

In order to keep my house somewhat clean and tidy, I have a cleaning schedule. I want to point out that I use the term “schedule” loosely here. Very, very loosely! If something doesn’t get done the day it’s supposed to get done, that’s okay. It doesn’t usually get done until its allotted day the next week. Mostly I just like this schedule because it reminds me what needs to get done if I want the house to look the way I like it.

Daily Things

In order for this system to work, I have a list of things I try to complete daily. Again, if something doesn’t get done, well it just doesn’t. But if I can get most of the things done most of the days, then things are going pretty well around here.

  • Make beds
  • Bathroom (swish the toilet, spray the shower, and wipe counters)
  • Laundry (one load)
  • Dishes
  • Wipe down counters and sweep kitchen
  • Pick up and put away random stuff


     Weekly Things

    I assign a category to each day of the week. Cleaning is not my first priority unless the house is just an awful disaster. But on days when I have a few minutes or an hour to spare, I try to use that time to get one of my weekly tasks done.

    • Monday - Bathrooms (deeper cleaning like tubs and mirrors)
    • Tuesday - Dusting and vacuum floors upstairs
    • Wednesday - Kitchen (clean microwave, stove top, and empty fridge for trash day)
    • Thursday - Dusting and sweep and mop floors downstairs
    • Friday - Monthly task (see below)
    • Saturday - Yard work (okay let’s be real, my husband does most of this)
    • Sunday - Meal prepping for the upcoming week, planning


      Monthly Things

      On Fridays, if I have time, I rotate out a list of tasks that should be completed monthly. I don’t ever get to all of them. But it’s nice to have a checklist!

      • Week 1 - Change air filters, backup data and devices, vacuum under furniture, car wash and vacuum
      • Week 2 - Quick declutter (any room, wherever it needs it) and donate, shred papers
      • Week 3 - Deep clean kitchen (pantry, fridge)
      • Week 4 - Quick declutter (any room, wherever it needs it) and donate, shred papers
      • Week 5 - Usually happens quarterly so this is mainly for seasonal stuff like decor or winterizing


        Of course, I use my Limelife Daily Specialty Notebook to remind me of these tasks. It is so satisfying to check them off as I complete them! Love cleaning schedules?

        Grab the one on the Limelife freebie page! It’s not the same schedule as mine here, but it’s way more colorful. Happy cleaning!


        This post was written by Kristan Kremer for the Limelife Planners Media & Creative Team. For more information about Kristan visit her on Instagram @kristankremer. Don't forget to share this blog entry with your friends!

        Creating and Using a Home Management Binder

        By Katie Poppe on August 24, 2016

        ‘What’s a home management binder and why would I want one?

        I’m a married lady and a mom to a dog; compared to parents with many kids and sometimes multiple jobs, my ‘life-crazy’ is pretty mild. But, I am also the type A personality that likes to have all my ducks in a row. I know the benefit of having everything I could possibly need for me, J*, the dog, the house, the cars, in one, easily accessed spot. When it’s time for car maintenance, I can grab the last receipt and know what I had done. When it’s time for the dog to have a vet checkup, I can see what immunizations he had last. 

        I also – obviously – use a planner for personal events, etc., but there’s no good way to keep track of everything in my planner! 

        The old process for this was the junk drawer in our apartment. I wish I was kidding.  Then, we decided to buy a house – what? Still can’t believe it. I knew there was no way that the old junk drawer method was going to work. I also have a terrible memory, and 9 times out of 10 I have to ask J* the answer to any of the 1000 questions I have. Like, when was the dog’s last grooming appointment? What’s the number for the bank again?  Sigh. 

        So, the home management binder was born. Now I don’t have to wait for J* to get home from work to answer my questions! :p

         What do you keep in a home management binder?

        Everyone’s family is different, so this is a tricky question – for us, it was house needs, personal needs, pet needs, etc. It has our bank info, our mortgage info, as well as emergency information in the event anyone actually needed it! Here’s the breakdown of our binder:

        BEFORE THE TABS

        1. Moving Checklist
        2. First Night Essentials
        3. Change of Address Checklist
        4. Change to our name list

        Because I decided to take the leap into the home management binder right before we moved, these sheets were crucial for us. It kept us totally organized throughout the process of closing on the house, packing up, cleaning and moving in! (Even if I’m still working on my ‘change of address’ list.  Priorities, people – unpacking my planner stickers came first! :p) 

        I am a firm believer in listing - make as many lists as you can, and stick to them. It makes even the most daunting tasks seem a little easier, and checking off what you've done as you go is very satisfying. But keep your lists together! Stay organized. 

        THE TABS

        1. 2016-2017 scheduling: I’m going to get us an 8.5x11 monthly layout for this, check it out!  [link: http://www.limelifeplanners.com/collections/8-5-x-11-monthly ]
        2. Contact & Vital Family Information: In this tab, I’ve got sheets for both J* and I and our personal/medical information, pet care sheets, contact info for our emergency contacts/friends/family, and house contacts. If there’s ever an emergency, I want it to be easily accessible for anyone to come in and be able to take over in my / our absence. It guarantees that the ‘kids’ and the house are cared for!
        3. Financial Information: What banks we have money in, our retirement funds, information on our mortgage lender, etc.
        4. Home & Auto Information: When was the last time I had the car serviced? Who has my auto loan? How much do I owe? It’s all here.
        5. Home Fun: One of my favorite tabs; a place to keep fun ideas for the house, image boards, etc. This can include coupons for stores, too!
        6. Vacation Information: J* and I take one trip to Cape Cod once a year for our anniversary, sometime around July. Because it’s such a staple in our lives, I wanted a tab just for this.

        The binder is totally a fluid process, too. If there’s to be a little human in our lives, I can add a tab for the kiddo. I could keep pediatrician info, school, and sports schedules in that section.

        ‘So what do I need to set up a home management binder?’

        Find a system that works for you. For us it was a 3-inch binder with a clear sleeve. I made an adorable cover page, using a free Limelife Planners desktop background download. There is a clear zipper pouch inside, and then tabs from Target. Again, this should be a system that works for you; some people would rather have a home management ‘command center’ with file folders, or a file cabinet. It’s all about your personal family flow, but whatever way you choose it should help make your life a little-less wacky! :p

        Do you think you’ll set up a home management binder? Do you already have one and have some other tips? Let me know in the comments!

        This blog post was written by Keri Thivierge for the Limelife Planners Media & Creative Team. For more information about Keri visit her on Instagram @steviedplans. Please share this blog entry with your friends! All we ask is that you give credit to Limelife Planners and the post author.

        Media & Creative Team: Call for Applications

        By Katie Poppe on August 22, 2016

        It is that time again! We are looking for new members for our Media and Creative Team! We are really excited at the interest we have seen from people wanting to apply to the team. It's great to see such passion and excitement for Limelife products!

        Who We Want

        We want passionate planners. We want the people that keep it simple in their planners, and the people that get creative. We want anyone who is passionate about productivity, goals, and the power of writing it down.

        Stand out applicants will have:

        Beautiful Photography

        A lot of what we ask from you is pretty images. We love sharing your pictures of Limelife products on Instagram and we want to see your planning in all it's HD glory. Here's an example of an excellent picture from a recent blog post from Kristan Kremer.

        Creativity

        By creativity we don't mean you have to be the next Michelangelo. What we really want is for you to have a creative mind so you can write about topics that you would want to read about. A big part of the M&CT job is writing blog posts. We want you to come to the team full of ideas on what you want to write and what images you want to share with our readers. Here's an example of a great post from Katie Clark.

        10 Dollar Tree Planner Supplies

        Passion

        We want folks who are passionate about Limelife Planners. We are proud of being a small business. We are proud to create products that help people achieve their goals. We want our Media & Creative Team members to feel the same way. Emilee Adams has been a member of the M&CT twice now. She has always showed a passion for a products through her posts on Instagram, Twitter, and Youtube. We love that she loves Limelife and shares that passion in her Youtube videos!

        How It Works

        In exchange for us sending you Limelife Planners goodies, you will write blog posts and share Instagram images of your Limelife "stuff."

        Responsibilities

        • Write three planner/organization/crafty related blog posts per month. Dates will vary and can be set up to accommodate your schedule. We will also work with you to come up with blog topics if needed. Or, new this time, in lieu of blog posts you can create 2 high quality Youtube videos per month featuring Limelife Planners Products.
        • Share at least 4 of your own images per month on your personal Instagram account, and tag #lovemylimelife, #limelifeplanners, #limelifeplanner. Most of the time we will be "re-gramming" these images on our Instagram (@limelifeplanners).
        • Email Katie with a headshot of yourself that will be used for our website and the footer of your blog posts (media@limelifeplanners.com). 

        In return, you'll get a FREE Limelife Planner of you choice as well as an advance sample of new products that we release during your time on our Media and Creative Team.

        Media and Creative Team members are hired for 5 month contracts.

        How to Apply

        Email your application to media@limelifeplanners.com.

        Include the following:

        • Name
        • Email Address
        • Social Links (Instagram, Pinterest, Blog, Youtube, etc.)
        • Attach 3 of your best product images to the email.
        • Statement of Interest (tell us why you want to be on our team)

        We will be choosing members by September 5th, and we are asking that you apply no later than September 2nd at midnight. Good luck!

        Look Inside My Layout C

        By Katie Poppe on August 19, 2016

        I use my planner to keep track of family, personal, home, and blog tasks. One thing that often frustrated me with planners that I used in the past was that the boxes forced me to organize my tasks unnaturally. That's why when I selected my very first Limelife Planner, I decided that Layout C seemed perfect!

        Instead of having daily columns divided into three sections, I could now distribute my tasks across six super-focused categories. It took me a couple of months to find my groove for what works (for now!) but I wanted to share how I am using my Layout C* in case it helps you make a decision when choosing your perfect Limelife layout.

        Today

        I use the first category on top for “today” things. Here is where I put any appointments or events that are happening that day.

        To-Do

        The second row is for general to-dos that I want to complete in a certain day. Most of the time, these tasks end up being my recurring housekeeping tasks, so sometimes I label the row “clean”.

        Blog

        Next, I put bloggy stuff in the third row. This is where I note if I have a post publishing and what I need to work on to keep things running smoothly.

        Social

        Social media is a huge part of my strategy to get people reading my blog, plus it is so much fun to share photos! I use Instagram the most. I like to have an idea of what I want to post on each platform every day so I know what kinds of pictures I should take in advance when the light is good. I also use this section to remind myself to automate some posts (like tweets and Facebook updates).

        Food

        The fifth row down is usually food, though sometimes I switch it around with fitness (usually the sixth row). This is just basic “what's for dinner” and sometimes I track water (I need to be so much better about water!).

        Fitness

        For a while, the sixth row would have the best of intentions but would end up empty most weeks. You know how it is, right? This spot is meant for tracking workouts and steps.

        I have changed things up some weeks, but this is what I usually end up coming back to. Funny thing is, now that I finally have it figured out, I will be changing things AGAIN. My blog is growing and I'm writing and posting more often so I need more space.

        Because of that, I've decided to devote my Layout C to my blog and use a separate planner for home stuff. I am so excited to use the new Limelife personal weekly inserts. They're going to fit just right in my Recollections binder (check here for an insert/binder size chart!). I think it will be perfect for general personal stuff to keep track of my family's schedule.

        For food and fitness, ordered the new Fitness Notebook. This is going to be a game changer for me, I can already tell. Shout-out to the other ladies in the We Love Limelife Facebook group that can't wait to use this notebook either!

        So that's a look at how I'll be using my Layout C until I settle into my new trifecta of Limelife goodness. I will be sure to write an update post for y'all when I switch things up and start using my Layout C solely for my blog.

        How do use your Layout C?

        *The images included in this blog post are of the previous version of Layout C. If you would like to take a look at the current version of the layout check out a free sample on the Weekly Layouts page.

        This post was written by Kristan Kremer for the Limelife Planners Media & Creative Team. For more information about Kristan visit her on Instagram @kristankremer. Don't forget to share this blog entry with your friends!

        Teacher Planner: Summer Pre-Planning!

        By Katie Poppe on August 08, 2016

        I teach; therefore I am a master of pre-planning. Okay, maybe not a master, but hey – I like to think so and it definitely makes me feel more confident! I pre-plan not only in my school planner, but also my personal one. I’ve got notes written out months and months ahead of time, because I ALWAYS forget!  It’s always a fun surprise to flip to a new month and see what I’ve got coming up!  If it’s something exciting, it never fails to feel like Christmas morning ;)

        Teachers know the value of their summer time, and – usually – we make the best of it by planning ahead for the upcoming year.  If you’re anything like me, though, you’re a glutton for punishment, and all big events get planned during the summer. I got married during the summer, and have moved several times during the summer. This summer, J* and I got the brilliant idea to buy a house! 

        What?

        In hindsight, doing this after school had started and I had a plan and a vision for the year already mapped out would’ve been the better choice…but hey.  I work with what I’ve got.  And this – this is what I’ve got. 

        Yikes.

        Someone send search dogs if you don’t hear from me for a few days. I’m somewhere underneath piles of extra kitchen stuff, poochie blankets, and planning supplies. 

        However, amidst all the insanity of moving, and cleaning our apartment…I haven’t forgotten that school is just around the corner. Our district goes back August 30th this year – before Labor Day for the first time, I think, ever – and I know it’ll be beyond stressful if I get totally behind on pre-planning!

        Planning ahead for your school year – or even your personal life – doesn’t have to be daunting! It should give you a sense of relief; it’s a big step to take, mapping out a few months at a time or documenting important dates. Here’s a sneak peek at how I plan ahead for a school year. 

        (Side-note: These Pilot Frixion pens? HUGE for teachers. Pens that erase. And erase well. Mind blown.)

        1. Holidays, no school days, and In-service days: Any days that I won’t be seeing kiddos need to be marked! That way, I won’t preemptively plan something for a day and get my scope and sequence all out of whack. 
        1. End of quarters, end of semesters, progress reports and report cards: Having these all marked keeps me on top of grading. If I know progress reports are due in two weeks, I know I have to get my butt in gear!! ;) It also helps me visualize the quarter as a whole, so I know how much time I have to cover something before a term ends.
        1. Staff meetings: Not the most ‘fun’ part of our job, but still essential – our school has two meetings per month, and it’s imperative that I know ahead of time when they are, so I don’t make appointments those afternoons.
        1. A “flexible” schedule of topics: I say flexible because time always gets away from you. Sometimes, things go quickly, and sometimes they take forever! If I at least know what I’m covering each quarter, I can adjust as needed. 

        Okay Keri, so how do you use this?

        I’ve gotten into the habit of checking my ‘monthly view’ before each week of planning – I mark down anything important from pre-planning in the appropriate days, and then fill in the rest around it. Without the pre-planning process, I’d be a mess. (And it’s happened; for a while I just decided to ‘wing it,’ and I’d be unpleasantly surprised by meetings, etc!)

        Do you only pre-plan in your planner?

        No way, José. A good chunk of summer ‘off’ time is getting ready for the first week of school! I set up class lists, first-week plans, seating charts, student surveys – always, always, always go into the first few days of school over-prepared! Even now, eight years into my career in the same school, and the same grade, I still have first-day anxiety. This calms my nerves significantly!

        What’s your pre-planning process like?  For all my teacher friends: if you have any tips on how you pre-plan, please share in the comments! I’m always looking for new ways to streamline my summertime planning.

        Good luck to all my teacher friends, going back soon! <3 


        This blog post was written by Keri Thivierge for the Limelife Planners Media & Creative Team. For more information about Keri visit her on Instagram @steviedplans. Please share this blog entry with your friends! All we ask is that you give credit to Limelife Planners and the post author.

        10 Dollar Tree Planner Supplies

        By Katie Poppe on August 02, 2016

        When I was younger, I’d spend a couple of weeks every summer with my aunt and cousins. My aunt would take us all to the dollar store on Sunday and let us pick 2 items each. I chose stationery every. single. time. Guess my inner planner girl was strong even back then.

        Thanks to the exceptional quality (hello, heavenly paper) and phenomenal customer service, I never hesitate to invest in products from Limelife Planners. However, I don’t have an unlimited budget and it would be easy to get out of control with spending on extra planner supplies. I balance my Etsy sticker shopping habit with less expensive (but equally adorable and functional) options. Here are 10 of my favorite planner supplies to check out at Dollar Tree.

        1. Containers & Organizers
        I use Dollar Tree containers to organize all over my house and my planner supplies are no exception. They come in a wide variety of shapes, sizes and colors so there’s always something to fill your needs. There’s usually one large display somewhere in the store, but don’t forget to check endcaps throughout for more options. For $1, they’re better-than-you’d-expect quality! You’re definitely not limited to the regular organizer section. Check out Kristan’s post here on the blog for clever ways other household organizers can be used for your planner supplies.

        2. Sticky Notes
        Whether you’re using them in your planner or for reminders around the house, a girl can never have too many sticky notes. At least that’s what I tell myself.  Dollar Tree does have a lot of basic square notes in bright colors, but they also have super cute specialty sticky notes. Some even come in a combo pack with coordinating page flags. The stock seems to change pretty frequently so if you see something you love, snag it. You’ll find most of them in the office supply section, but also check the display racks around the checkout lanes for more specialty items. Wouldn’t these hashtag sticky notes be perfect for scheduling social media posts? The coffee and sweet treat themed set is maybe one of my favorite ever Dollar Tree finds.

        3. Washi Tape
        Washi tape seems to be the unicorn of the Dollar Tree planning world. It’s not always easy to find, but when you do it’s a major score. The prints tend to be super on-trend and I really love the weight and feel of the tape and strength of the adhesive. When I’ve found washi, it’s been on one of those hangy display things (technical term) in the office supply, art supply or teacher supply aisles. NOTE: I didn’t care for the holographic or glitter washi 2-packs I tried from Dollar Tree. The adhesive was more like duct tape than masking tape and too sticky for my taste. The glitter also shed really bad.

        4. Pen & Pencil Bags

        I have a major pen addiction which I’m pretty sure comes with the territory of planner love. I do some of my planning on the go and I like taking a variety of pens with me when needed. These zip pouches are a great option! I love the variety of prints and solid colors. Some of them even have reinforced holes so they’re easily added to a binder.

        5. Paper Clips & Binder Clips
        I use several clips in each of my planners to mark pages for easy reference.  Whether you prefer decorative binder clips or more basic options, Dollar Tree has you covered. I love the bright colors of these basic coated paper clips. The cute shapes on the binder clips would make a super fun addition to any planner.

        6. Vinyl Decals
        These decals are typically used to decorate walls. They also stick really well to laminated surfaces. You can add them to your dashboards and bookmarks for an extra pop or use them to decorate your 7x9 planner covers and interchangeable covers. I love the idea of using the alphabet sets to create a monogram! These are removable if you’re careful.

        7. Stickers
        The Dollar Tree has a TON of stickers! I don’t typically find a lot that match my planner style, but I can usually find something if I dig enough. I flipped through part of display after taking this picture and found some super cute donut stickers that came home with me. Remember that the puffy or 3D stickers will add bulk to the pages of your planner so if you like things to lay flat, skip those. Looking for something a little more functional? You can also find write-on label stickers in the office supply section. Use them right in your planner or on those containers I mentioned earlier to label your newly-organized planner station.

        8. Coupon Organizers
        I love these for organizing my coupons and I also use them for planner supplies. They’re great for separating small sticker sheets. They can also be used to get organized for on-the-go planning and planner meetups.

        9. Page Flags
        The Target page flags definitely seem to be a favorite in the planner world. It seems like there are a lot of people who struggle to find them in their stores. Maybe you just want something a little different. Dollar Tree page flags are another great option. As I mentioned before, some of them come in a set with sticky notes. They also have some adorable page flags in their own packages. Fun + functional = my favorite kind of planner supplies!

        10. Planner Bands

        I’m constantly amazed at the number of headband options at Dollar Tree.  I’ve never actually worn one on my head, but I recently discovered that they are the perfect size for holding my planner and notebooks neatly closed. As someone who misplaces my planner bands on the regular, I like having a few extras on hand just in case. The headbands with the rubber grippy things (another technical term) on the back are especially good for helping them stay put on your planner or notebook.

        How do you use dollar store items in your Limelife planner? Share your pictures with us on social media and tag your posts with #lovemylimelife and #limelifeplanners.


        This blog post was written by Katie Clark for the Limelife Planners Media & Creative Team. For more information about Katie visit her on Instagram @katiedidproductions. Please share this blog entry with your friends!

        Managing a Long To-Do List

        By Katie Poppe on August 01, 2016

        You know those days when it seems like the to-do list will never end? Those are the days when the things don’t all fit in the planner and you definitely won’t need any help filling in the blank space.

        Sometimes it is hard to focus when you’re faced with a daunting list of things to do. I know I have trouble staying on task when I know there’s just a slew of other things to do when I finish.

        Here are some tips to help cope with that long to-do list. When I'm feeling stuck or like I'm just spinning my wheels, I try to make sure I've covered some of the things here to help me focus. 

        TIPS FOR MANAGING A LONG TO-DO LIST

        Get dressed

        I know the sweatpants are comfy. Trust me, mine are my uniform when I'm not leaving the house (and even sometimes when I do leave #sorrynotsorry). But there's something about changing into fresh clothes (and a pair of real shoes!) that signifies to my brain that it's time to get things done.

        Take care of yourself

        When we're busy, it's easy to put ourselves last. The problem is that we're always busy! You cannot keep putting yourself last, or else you won't be able to operate productively. Take a walk, do some yoga, or read something for pleasure. Heck, even just take a shower!

        Drink water

        Water is so important, y'all. I know you hear it often, but that's because it's true! Staying hydrated will keep your head clear so you can focus on your list.

        Slow down

        Sure, going full speed ahead will help you get that list tackled ASAP. But you're not a machine! All work, all the time will only lead to burnout. Give yourself some grace and take some breaks.

        Stop multitasking

        I am a recovering multitasker. I have been training by brain to work on as many things as possible since middle school, so I will be the first to tell you that it's a hard habit to break. But I've noticed I can get more done (and done RIGHT!) When I concentrate on one thing at a time.

        Change scenery if possible

        This is totally dependent on your specific tasks. Sometimes a move to another location can help you focus on the things you need to do. For instance, at this very moment I am sitting at Panera Bread to type this up. I had 30 minutes between errands so I popped in, ordered a cup of tea, and got to work.

        List top 3 priorities

        The best way to feel productive with your long to-do list is to know your priorities. If you spend most of your time plugging away at tasks that aren’t as important then you may run out of time to tackle the big things. Get the important stuff done first and feel accomplished no matter how many other menial tasks you cross off for the rest of the day.

        Remove distractions

        Turn off the TV, and logout of social media. You’d be surprised how much time you spend scrolling Instagram when you have a minute free. Spoiler alert - it’s probably way more than a minute! If you have small children, this one could be difficult. You may have to work in 5-10 minute spurts while they are otherwise entertained with something else.

        Set a timer

        Decide how long you can dedicate to a task then set a timer and get to it. Work nonstop the entire time until the timer goes off, then take a short break. This method is often referred to as the Pomodoro Technique.

        Connect with accountability partners

        Finally, one way to stay focused is to connect with others that are also trying to work through their to-do list. Text your friend or sister and ask her to check in on you in a few hours. I’m sure she’ll be happy to oblige if you return the favor!

        A long to-do list can seem extra daunting without a plan, but using some of these strategies can help you whip it into shape.

        This post was written by Kristan Kremer for the Limelife Planners Media & Creative Team. For more information about Kristan visit her on Instagram @kristankremer. Don't forget to share this blog entry with your friends!